Thursday, July 1, 2010

A visit from a master........

Richard Wasserman graciously came to my architectural photography class at SAIC yesterday to share his fine work. He showed original prints of two outstanding bodies of work, his Chicago River and Bensenville series. Richard is one of those guys I consider the "salt of the medium" doing fine work on their own because you are simply driven to by the subject matter.

Thanks so much Richard. It was a treat for the me and the students. Best of luck with the upcoming book of the Chicago River images and accompanying exhibit at the Harold Washington Library.

http://richardwasserman.net/
__________________
Thanks,
Kirk

Sunday, June 27, 2010

Shooting Tethered

There are many programs available for shooting tethered to a computer. Working up to an interior lighting demo for my students, I revisited Canon's EOS Utility/DPP and Lightroom 3 (the old Watch or "Hot Folder" method), a couple of software programs that support tethering. In the past I had not been impressed with earlier versions of either program for tethering. Both were flaky IME.  For clients on a shoot that required a larger viewing experience, I used to resort to using a card reader or spend half my time fiddling with the computer link, embarrassing and stressful. LR3 now has a specific tethering feature that works with most recent major Canon and Nikon cameras (for supported cameras see. Nikon also has free software that comes with their cameras but I am not familiar with it.

Both programs seem much more stable now. Cannon EOS Utility/DPP supports full camera exposure control (plus ISO etc.) from the computer, while LR3 supports shutter firing and exposure info display only. Neither will work firing from the computer if you shoot with the Mirror Lockup on. I only shoot with the Mirror Lockup on, to minimize vibrations, so firing from the computer is not important to me. Why mirror locked up? Not to sound like a broken record, but to do truly professional quality work with a DSLR you have to make every possible effort available to maximize image quality. However both these programs seem less than happy when you shoot with MLU on, especially if you et the camera go to sleep and then try and wake it up by firing a shot. If this is an issue go back to regular firing.

In any event of the two I found LR3 to be the program that best fit my skills and workflow. I have never gotten comfortable with DPP. As I always shoot RAW and use Adobe Camera RAW in Photoshop to process the files, it is a short leap for me to the RAW processor in LR3, which though it has a slightly different interface than ACR is basically the same program. In the spirit of KISS (keep it simple stupid), a nod to my aging brain, the Canon 5d MKII>LR3>Photoshop workflow keeps things streamlined. Now of course LR3 is not free like the Canon DPP software suite is (DPP comes with the Canon camera and you can't download DPP from their website unless you have the original disks). Lightroom approaches $300, which may be a consideration for many.

Only the DPP suite supports tethered Live View. LR3 will not-again not very important to me.

One annoying thing. If you have the DPP suite loaded on your computer, even if you also have LR3 loaded and running, DPP seems always to be the default program to open up when you make an image while synced. if you work continually it only comes up the first time, but if you take a break and let the camera go to sleep and come back and try to fire the camera, the EOS Utility want to open up again. There seems to be no way around this unless you uninstall the EOSU/DPP suite. Anyone have any ideas on this? For teaching purposes I want to keep both on my laptop and for the odd time I want to shoot tethered in Live View. See the discussion below with Jim Hunter for a fix he found for this for both Mac and PC. See also Mac Fix.

Tuesday, June 22, 2010

Louis Sullivan through the eyes of Nickel, Szarkowski and Siskind

"Looking after Louis Sullivan: Photographs, Drawings and Fragments".
One of the best architectural photography exhibits I have ever seen is this newly opened Sullivan exhibit at the Art Institute of Chicago. Featuring images of Sullivan's designs by Aaron Siskind, John Szarkowski and Richard Nickel, this exhibit features many widely known and lesser known masterpieces of modern architectural photography. The exhibit also displays Sullivan's masterful drawings and many ornamental details salvaged from buildings. The museum did nothing in 2006 for the Sullivan 150 year anniversary, so this is 3 years late and low key-but superb. See it if you possibly can.

Looking After Louis Sullivan.....

Sullivan Exhibit

Vanishing Point Clone Tool in PS

This has been around since CS2, but I didn't discover it till CS4. Doh! I could have been using it for years. Going one step further from the cloning I taught in class the other day, lets look at "Vanishing Point Cloning". This, IMHO, is one of the most useful tools for architectural photographers in all of PhotoShop, because it allows one to perform corrections while maintaining perspective. From removing stains appropriately in carpets to fixing brick work, this tool has a myriad of uses. I went years before I discovered this procedure, and then it was one of these "Holy Crap" moments. Why didn't I discover this years ago! Imagine how many ways you can use this. The basic filter/tool is used this way:

Vanishing Point Clone Tool Video and More Vanishing Point Cloning

and a more involved and a bit over the top tutuorial for the Vanishing Point filter. There are some techniques to learn here that can be used in more believable and appropriate ways for traditional architectural photography. For instance I have used the wheels example similarly for replacing light fixtures that were not working. The exercise with the grass, I have used many times to fix bad areas in a lawn or pavement. Yes, IMHO, perspective in size of grass blades in a lawn or the granularity of pavement is important to pay attention to:

Vanishing Point: Photoshop Tutorial Video

Enjoy!

Thursday, June 10, 2010

AP Photo Class-Examples from the First Assignment.

From classic documentation to elegant details, a few examples of the outstanding images by the students from the first assignment, photographing the Loop.


Above, fireworks exploding from the fog over the Lake Michigan by Marc Falzon.


Above, a detail of the Aqua and adjacent building by Mona Luan.


Above, the facade of the Merle Reskin theater by Susanah Ribstein.


Above, the Tribune building entry by Mona Luan.


Above, the Aqua Building by Alli Gentles.

Tuesday, June 8, 2010

Saturday, June 5, 2010

AP Photo Class-30D/40D Manual Exposure

Have fun with this! Do the best you can. The weather sucks so be creative! Don't drop your lens! Ha Ha.
Frankly there is not much out there that is simple or brief for the 30D. Here are the relevant pages from the official Canon 30D manual:


The whole manual in PDF form can be accessed here 30D Manual.

For the 40D there is a video here 40D Video.
The manual is here 40D Manual.

and the relevant page is:


Again, have fun with this! Do the best you can. The weather sucks so be creative!

Thursday, June 3, 2010

"Thoughts on Perspective Correction" AP Class Notes

I am a big believer in using Tilt Shift lenses to correct perspective with DSLRs, but newbie's may not have the resources for these expensive lenses. As I have said, ad-nauseum, to do professional level AP work with a DSLR you have to carefully structure your work flow to maximize file quality at every step. Doing perspective correction in Photoshop eats quite a few pixels and introduces a fair amount of computer interpolation in the stretched areas. These kinds of practices lead to image degradation, but for end products like websites, this quality may be acceptable.

EXAMPLES
Leveled camera=too much foreground.


Unless you compose for it.


Point the camera up to get rid of the foreground and you get massive perspective convergence.


Do a simple PC in Photoshop and you get what I call truncating of the forms-they come out way to squat and you lose allot of the left and right edges. More PS work ensues to correct the squat!


Whereas correcting perspective with a Tilt Shift lens preserves the proportions and the edge framing.


There are many ways to correct perspective. Even with T/S lenses you may not have enough rise and still need to point the camera up slightly. I prefer the one below because the correction is rarely symmetrical (instead of the more common method see this Simple Method which is worthless unless you had truly leveled the camera before pointing it up and had symmetrical perspective problems. With this next method you correct each side separately. Prefered Method of PC. Remember sometimes a very slight convergence looks more natural than a fully corrected perspective on very tall buildings.

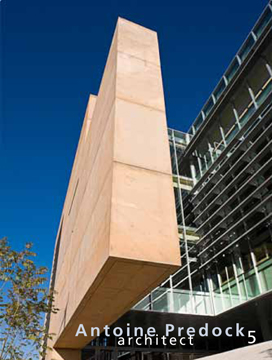
But sometimes....sometimes the best thing to do is just make the composition work with a ton of convergence. Example-My recent image on the cover of Antoine Predock's new Rizzoli monograph (number 5) =The University of New Mexico School of Architecture.

AP Class at SAIC (2)

The class is full with enthusiastic students. We have some exciting projects in the cue. It looks like it will be a great class. More to come.

Tuesday, May 25, 2010

Ahhh....Chicago

Tomorrow morning early.......the big pilgrimage to Chicago to teach my AP class at SAIC. Chicago has the best collection of architecture in the country.

Saturday, May 15, 2010

Progressive Stretch-Extreme Perspective Correction Issues & Techniques

Luminous Landscape
Interesting thread started by Marc Gerritsen, a top notch pro in the far east, about what you do when you approach the limits of your movements and start getting weird artifacts and scaling distortion in your AP images.

Monday, May 10, 2010

Christopher Barrett's Talk at ProGear in Chicago

Top AP pro Christopher Barrett is giving a seminar at ProGear in Chicago and talking about Arca cameras, Phase One backs and Profoto strobes. I hope to see some of you all there. That is on June 7 starting at 5:00 at:

ProGear
Address:
1740 W. Carroll Avenue
Chicago, IL 60612

Telephone 312-376-3770

Wednesday, May 5, 2010

Adobe® Lens Profile Creator

Adobe® Lens Profile Creator

This tool for Photoshop CS5 may be useful for creating lens correction profiles for T/S lenses at varying degrees of shift. I'm not sure about this yet but I will be testing this idea over the next few months. If anyone else tries this method, let me know your thoughts.

See this other thread here: New CS5 Lens Correction Tool

And watch this thread on Luminous Landscape.

Monday, May 3, 2010

AP Class at SAIC

I got the word-my class in June at The School of the Art Institute of Chicago filled up. Its a go-you never know in this economy! I'll be in Chicago from June 1st-July10th staying in the visiting artist condos on Michigan Ave. Teaching is very stimulating for me. We will visit Hedrich-Blessing as always (like a pilgrimage to Mecca for an AP). I should come up with allot of new thoughts on AP for posts here.

Thursday, April 29, 2010

Thoughts on diffraction.....

What is it? Basically in architectural photography we use small apertures for maximum depth of field. But if you stop down to an aperture smaller than optimum a problem referred to as diffraction crops up to compromise the overall sharpness of the film/file. It is easy to see this effect with a DSLR by doing a series of equivalent exposures of say a textured wall-stopping down the lens a full stop each time while slowing down the shutter speed a full stop each time to give an equivalent exposure. At a given smaller aperture the sharpness will ever so slightly start to decline-usually with DSLR lenses around f11-and get progressively worse as you stop down further. What does this mean with architecture? Usually I want maximum depth of field (depth of focus) so I am always stopping down. But at what point does diffraction become objectionable? By my tests (for example with a 24 T/S II) diffraction starts to hint at an aperture smaller than f11. Remember a smaller aperture is a larger number right? F8 is a larger aperture than f22. But back to my 24mm test, f11 does not give me enough depth of field most of the time especially if I have a close foreground and a building in the background filling the frame (a near/far composition which amounts to allot of my shots). My compromise? F13 (unless I know the images are going to only be used small I may go to f16 or even f22 rarely). Note a touch more sharpening can hide a touch of diffraction. This from the LargeFormat Forum may help explain this:


DIFFRACTION
A beam of light passing through a circular aperture spreads out a little, a phenomenon known as diffraction. Diffraction is a physical phenomena which is inescapable. The smaller the aperture, the more the spreading. For photographic lenses, diffraction depends only on the f-number. Strictly speaking, diffraction is a function of aperture size or the physical size of the hole and that is how it would be defined in a physics textbook. Which means that the larger area aperture in a 300mm lens at f/16 (as compared to a 50mm lens at f/16) should provide lower diffraction. However, diffraction patterns are angular patterns and as such are dependent on how far from the aperture you place the screen used to view it also. In photography, the aperture is at the optical center of the lens and the screen is (for infinity focus) one focal length away. The physical size of the diffraction blur is then the focal length divided by the apparent size of the aperture i.e., the definition of the f stop. Thus, in photography, diffraction is only a function of f stop and not a function of the focal length. In simpler terms, the larger aperture of the 300mm lens does offer lesser diffraction at the diaphragm (i.e., less bending around the diaphragm) but since the light now has a longer distance to travel (as compared to the 50mm lens), the smaller bending still results in a fair bit of blur at the viewing screen. N Dhananjay

On digital cameras it is a little more complex, because you have to factor in weird things like pixel pitch. If you are a techy read this. If you do their calculations on my lens/camera example above, you see that at f11 I am not diffraction limited but at f13 it is just starting-which confirms my field tests. Otherwise if you are just a shooter like me just do the simple testing I suggested and pick your optimum aperture for the lenses and scenes you like to photograph. Remember my POV. To make a DSLR do first class professional AP. You must maximize at every step the quality of the image. In this case that means getting the smallest aperture possible without inducing too much diffraction.

Ian raised an interesting point:

Hi Kirk. Firstly, thanks for taking the time to write this blog. I appreciate the effort in communicating your insights, techniques and link sharing. In response to this post, is there a possible part 2 in which you share how using a t/s, angled down 8 degrees, helps give the illusion of greater depth of field? I'm guessing on the degrees, as I do not as yet own a t/s. Could a statement be made such as, 'if you're stuck at f/13 due to diffraction but angle your t/s by this amount, it'll look like you're at f/22' or some such thing?
Thank you sir,
Ian.

Excellent point Ian. It raises the issue of tilts which can effectively give an image an exaggerated DoF. Frankly I don't use much tilt on architecture (I use it allot on landscape), because I work fast and tilts can get you into allot of trouble. Basically tilts change the plane of focus from parallel to the wall or building to a plane slanted (if you tilt forward) from the foreground to the top of the background. This leaves the bottom of buildings potentially waaaaaay out of focus and your DoF may not pull it back into focus. So use tilt verrry sparingly like no more than 1/8 to 3/16 of an inch forward tilt and refocus on the foreground a bit away from camera position and the building a bit below the top and look CLOSELY at the bottom of the building and see if it is way to far out of focus-use your Live View focusing magnifier to take a good look and see if you are in the ballpark. You may need more or less tilt. Remember to keep the building straight-you still keep the camera level as you tilt the lens forward. I strongly suggest practicing this some and looking at the files blown up on your monitor to really see what is OK in terms of tilt and aperture and DoF.
 
Add to Technorati Favorites