There are many programs available for shooting tethered to a computer. Working up to an interior lighting demo for my students, I revisited Canon's EOS Utility/DPP and Lightroom 3 (the old Watch or "Hot Folder" method), a couple of software programs that support tethering. In the past I had not been impressed with earlier versions of either program for tethering. Both were flaky IME. For clients on a shoot that required a larger viewing experience, I used to resort to using a card reader or spend half my time fiddling with the computer link, embarrassing and stressful. LR3 now has a specific tethering feature that works with most recent major Canon and Nikon cameras (for supported cameras see. Nikon also has free software that comes with their cameras but I am not familiar with it.
Both programs seem much more stable now. Cannon EOS Utility/DPP supports full camera exposure control (plus ISO etc.) from the computer, while LR3 supports shutter firing and exposure info display only. Neither will work firing from the computer if you shoot with the Mirror Lockup on. I only shoot with the Mirror Lockup on, to minimize vibrations, so firing from the computer is not important to me. Why mirror locked up? Not to sound like a broken record, but to do truly professional quality work with a DSLR you have to make every possible effort available to maximize image quality. However both these programs seem less than happy when you shoot with MLU on, especially if you et the camera go to sleep and then try and wake it up by firing a shot. If this is an issue go back to regular firing.
In any event of the two I found LR3 to be the program that best fit my skills and workflow. I have never gotten comfortable with DPP. As I always shoot RAW and use Adobe Camera RAW in Photoshop to process the files, it is a short leap for me to the RAW processor in LR3, which though it has a slightly different interface than ACR is basically the same program. In the spirit of KISS (keep it simple stupid), a nod to my aging brain, the Canon 5d MKII>LR3>Photoshop workflow keeps things streamlined. Now of course LR3 is not free like the Canon DPP software suite is (DPP comes with the Canon camera and you can't download DPP from their website unless you have the original disks). Lightroom approaches $300, which may be a consideration for many.
Only the DPP suite supports tethered Live View. LR3 will not-again not very important to me.
One annoying thing. If you have the DPP suite loaded on your computer, even if you also have LR3 loaded and running, DPP seems always to be the default program to open up when you make an image while synced. if you work continually it only comes up the first time, but if you take a break and let the camera go to sleep and come back and try to fire the camera, the EOS Utility want to open up again. There seems to be no way around this unless you uninstall the EOSU/DPP suite. Anyone have any ideas on this? For teaching purposes I want to keep both on my laptop and for the odd time I want to shoot tethered in Live View. See the discussion below with Jim Hunter for a fix he found for this for both Mac and PC. See also Mac Fix.
Sunday, June 27, 2010
Tuesday, June 22, 2010
Louis Sullivan through the eyes of Nickel, Szarkowski and Siskind
"Looking after Louis Sullivan: Photographs, Drawings and Fragments".
One of the best architectural photography exhibits I have ever seen is this newly opened Sullivan exhibit at the Art Institute of Chicago. Featuring images of Sullivan's designs by Aaron Siskind, John Szarkowski and Richard Nickel, this exhibit features many widely known and lesser known masterpieces of modern architectural photography. The exhibit also displays Sullivan's masterful drawings and many ornamental details salvaged from buildings. The museum did nothing in 2006 for the Sullivan 150 year anniversary, so this is 3 years late and low key-but superb. See it if you possibly can.
Looking After Louis Sullivan.....
Sullivan Exhibit
Vanishing Point Clone Tool in PS
This has been around since CS2, but I didn't discover it till CS4. Doh! I could have been using it for years. Going one step further from the cloning I taught in class the other day, lets look at "Vanishing Point Cloning". This, IMHO, is one of the most useful tools for architectural photographers in all of PhotoShop, because it allows one to perform corrections while maintaining perspective. From removing stains appropriately in carpets to fixing brick work, this tool has a myriad of uses. I went years before I discovered this procedure, and then it was one of these "Holy Crap" moments. Why didn't I discover this years ago! Imagine how many ways you can use this. The basic filter/tool is used this way:
Vanishing Point Clone Tool Video and More Vanishing Point Cloning
and a more involved and a bit over the top tutuorial for the Vanishing Point filter. There are some techniques to learn here that can be used in more believable and appropriate ways for traditional architectural photography. For instance I have used the wheels example similarly for replacing light fixtures that were not working. The exercise with the grass, I have used many times to fix bad areas in a lawn or pavement. Yes, IMHO, perspective in size of grass blades in a lawn or the granularity of pavement is important to pay attention to:
Vanishing Point: Photoshop Tutorial Video
Enjoy!
Thursday, June 10, 2010
AP Photo Class-Examples from the First Assignment.
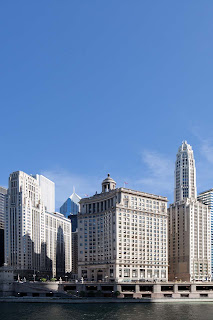
From classic documentation to elegant details, a few examples of the outstanding images by the students from the first assignment, photographing the Loop.
Above, fireworks exploding from the fog over the Lake Michigan by Marc Falzon.
Above, a detail of the Aqua and adjacent building by Mona Luan.
Above, the facade of the Merle Reskin theater by Susanah Ribstein.

Above, the Tribune building entry by Mona Luan.
Above, the Aqua Building by Alli Gentles.
Above, fireworks exploding from the fog over the Lake Michigan by Marc Falzon.
Above, a detail of the Aqua and adjacent building by Mona Luan.
Above, the facade of the Merle Reskin theater by Susanah Ribstein.

Above, the Tribune building entry by Mona Luan.
Above, the Aqua Building by Alli Gentles.
Tuesday, June 8, 2010
AP Photo Class-Raw processing in Adobe Camera Raw
This is a pretty good quicky overview of the most basic aspects of camera raw:
Camera Raw
Camera Raw
Saturday, June 5, 2010
AP Photo Class-30D/40D Manual Exposure
Have fun with this! Do the best you can. The weather sucks so be creative! Don't drop your lens! Ha Ha.
Frankly there is not much out there that is simple or brief for the 30D. Here are the relevant pages from the official Canon 30D manual:
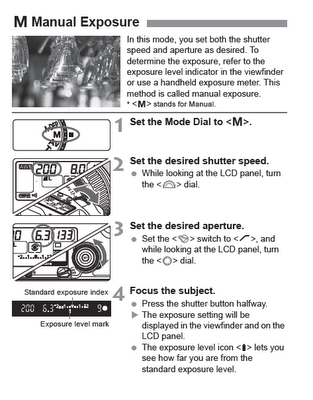
The whole manual in PDF form can be accessed here 30D Manual.
For the 40D there is a video here 40D Video.
The manual is here 40D Manual.
and the relevant page is:
Again, have fun with this! Do the best you can. The weather sucks so be creative!
Frankly there is not much out there that is simple or brief for the 30D. Here are the relevant pages from the official Canon 30D manual:

The whole manual in PDF form can be accessed here 30D Manual.
For the 40D there is a video here 40D Video.
The manual is here 40D Manual.
and the relevant page is:
Again, have fun with this! Do the best you can. The weather sucks so be creative!
Thursday, June 3, 2010
"Thoughts on Perspective Correction" AP Class Notes
I am a big believer in using Tilt Shift lenses to correct perspective with DSLRs, but newbie's may not have the resources for these expensive lenses. As I have said, ad-nauseum, to do professional level AP work with a DSLR you have to carefully structure your work flow to maximize file quality at every step. Doing perspective correction in Photoshop eats quite a few pixels and introduces a fair amount of computer interpolation in the stretched areas. These kinds of practices lead to image degradation, but for end products like websites, this quality may be acceptable.
EXAMPLES
Leveled camera=too much foreground.
Unless you compose for it.
Point the camera up to get rid of the foreground and you get massive perspective convergence.
Do a simple PC in Photoshop and you get what I call truncating of the forms-they come out way to squat and you lose allot of the left and right edges. More PS work ensues to correct the squat!
Whereas correcting perspective with a Tilt Shift lens preserves the proportions and the edge framing.
There are many ways to correct perspective. Even with T/S lenses you may not have enough rise and still need to point the camera up slightly. I prefer the one below because the correction is rarely symmetrical (instead of the more common method see this Simple Method which is worthless unless you had truly leveled the camera before pointing it up and had symmetrical perspective problems. With this next method you correct each side separately. Prefered Method of PC. Remember sometimes a very slight convergence looks more natural than a fully corrected perspective on very tall buildings.
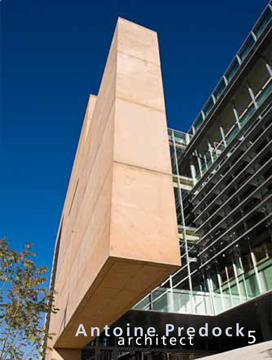
But sometimes....sometimes the best thing to do is just make the composition work with a ton of convergence. Example-My recent image on the cover of Antoine Predock's new Rizzoli monograph (number 5) =The University of New Mexico School of Architecture.
AP Class at SAIC (2)
The class is full with enthusiastic students. We have some exciting projects in the cue. It looks like it will be a great class. More to come.
Subscribe to:
Comments (Atom)


