Architecture is the crucible of HDR programs. The hard edges between light and dark areas generate halos etc. Up to this point I ALMOST ALWAYS found it better to light the site artificially rather than try and make an HDR image look decent. Don't think I didn't try. I own or have tried most if not all the HDR programs out there and largely given up in frustration.
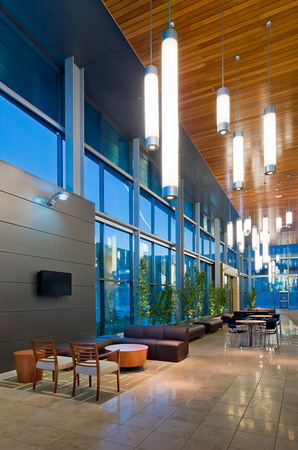
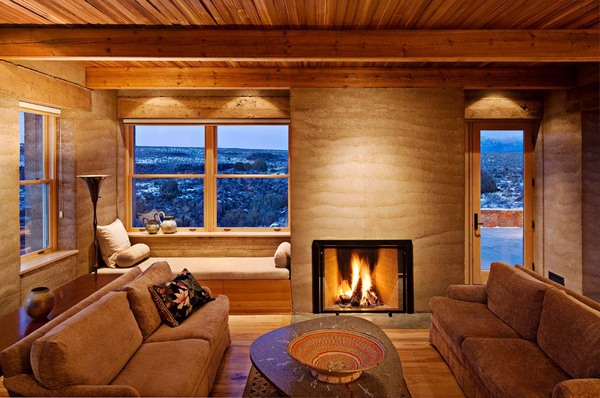
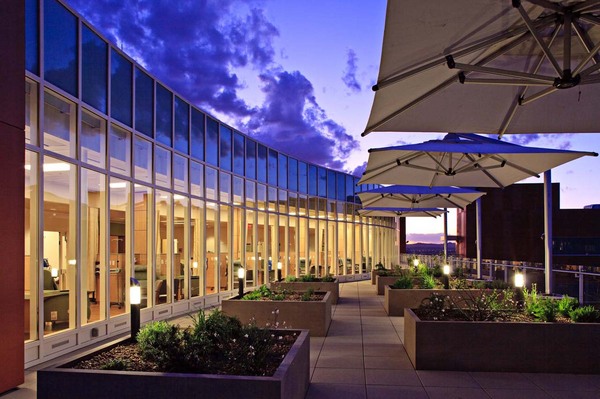
Then came Lightroom 3 and the Enfuse Plugin. I have much testing to do, but my initial tests show great potential. The test below (bottom) is the DEFAULT settings from a 2 stop exposure bracket, straight from the DNGs in LR3. The image on the top is the unaltered "middle" exposure. Hmmmm........
Architecture by Dekker Perich Sabatini-Albuquerque, Las Vegas and Amarillo. The University of Nevada Reno Center for Molecular Medicine in Reno Nevada.
Now you might say that this could be done by boosting the Recovery and Fill Light sliders and.......yes you could and I did, but you concurrently generate pattern noise in the shadows you boost. Enfuse's method of sampling the shadows from the brightest exposure creates bright shadows with zero noise (this is typical of all the HDR programs I have tested).
This HDR'd result tries to more closely mimic the eyes experience of the scene where the eye dilates as it moves from shadowed areas to the windows. If you overdue it, bringing the window light down further, the lack of brightness in the windows seems unnatural resulting in that overdone HDR effect.
Tuesday, September 28, 2010
Sunday, September 19, 2010
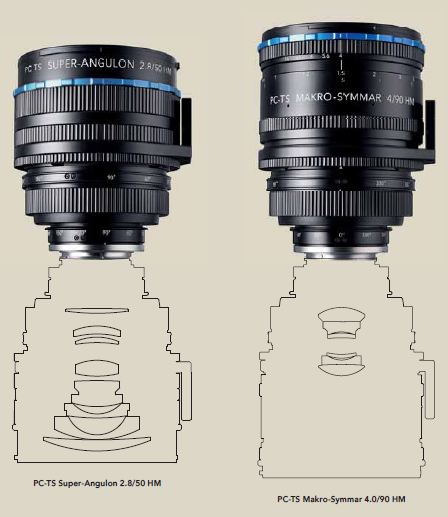
Have you been waiting for the Canon upgrades to the 90 and 45 T/S lenses? Lenses on par with the new 24T/S II and 17? Schneider jumps in with some mighty contenders!
Schneider T/S
According to recent reports from Photokina, these lenses have manual apertures, which at this price point is a real drag.
Schneider T/S
According to recent reports from Photokina, these lenses have manual apertures, which at this price point is a real drag.
Saturday, September 18, 2010
Scanning for Fine Art Images
Imacon "Virtual Drum Scan" vs. Epson 750 home scan vs. Aztec Premium Drum Scan
Frankly most of my serious efforts with scanners and scans revolve around my B&W work. Of course I have, prior to digital, had thousands of my commercial color transparencies scanned for magazines, books, posters etc. but I was rarely involved in that. For a couple of years, just prior to digital, I did do allot of my own scanning for commercial publication because I was behind the times and everyone just wanted files. I never found that a home scanner like an Epson 750 (in my hands) could deliver what a commercial drum scan could deliver on transparencies for publication. They suffered in the shadow areas, highlight separation, color fidelity etc. I never had any complaints from clients, but I could see the difference.
It is certainly true IME that the major differences of home flatbeds and pro drum scans lies in resolution and in the renderings of the extremes of the tonal range. My 750 cannot pull detail out of deep shadows anywhere close to a good drum scan and I believe at the other end of the scale in the highlights that there is some flaring that takes place in home flatbeds that obscures fine detail in dense highlights.
I believe this is part of the key to maximizing tonal control from the Epson scanners. Shoot and develop for the limitations of the scanner. With a drum scan I just shoot normally using basic Zone System controls, but to maximize a scan on an Epson I would place the low values higher and develop the highlights lower.
BTW, I visited the printing service (Pat Carr-Carr Imaging-a true master) I use for large digital prints yesterday, who was working on a print of mine that I had never printed in silver or ink larger than 16x20 before (4x5 TRI-X in HC-110). I have never owned a printer that would print over 17" wide. This is a print 24x33-actually the largest art print I have ever made and is for an upcoming museum show. It was scanned by me on a well maintained Imacon at SAIC and looked superb at that size. The grain (or grain clumping I don't suppose that an Imacon can actually resolve grain) was sharp and tight and looked great even on close inspection with my reading glasses, requiring no additional sharpening than the original Imacon capture sharpening (I don't remember the setting). This was never a "look" that I could get on large prints with my Epson. As a backup I had Lenny Eiger, Eiger Studios, do a drum scan of the same image in case it didn't hold up at that size. Lenny's scan pulled more deep shadow detail out of the negative, but I didn't need it-not a wasted expense anyway-I am archiving quality drum scans of all my best images from the past 30 years.

I know Lenny's drum scan has more deep shadow detail than the Imacon, but I tend to print this pretty deep anyway. There is a fair amount of work in the file and with a tight deadline looming, I was not wanting to start over with a new scan unless I had to. But in terms of resolution the Imacon could handle this size and on this image the tones were fine too.
Frankly most of my serious efforts with scanners and scans revolve around my B&W work. Of course I have, prior to digital, had thousands of my commercial color transparencies scanned for magazines, books, posters etc. but I was rarely involved in that. For a couple of years, just prior to digital, I did do allot of my own scanning for commercial publication because I was behind the times and everyone just wanted files. I never found that a home scanner like an Epson 750 (in my hands) could deliver what a commercial drum scan could deliver on transparencies for publication. They suffered in the shadow areas, highlight separation, color fidelity etc. I never had any complaints from clients, but I could see the difference.
It is certainly true IME that the major differences of home flatbeds and pro drum scans lies in resolution and in the renderings of the extremes of the tonal range. My 750 cannot pull detail out of deep shadows anywhere close to a good drum scan and I believe at the other end of the scale in the highlights that there is some flaring that takes place in home flatbeds that obscures fine detail in dense highlights.
Quote:
| And if you take that into account when exposing and developing your film, you should be able to get as much shadow detail as you'd like in your images, even using an Epson scan. Peter De Smidt |
BTW, I visited the printing service (Pat Carr-Carr Imaging-a true master) I use for large digital prints yesterday, who was working on a print of mine that I had never printed in silver or ink larger than 16x20 before (4x5 TRI-X in HC-110). I have never owned a printer that would print over 17" wide. This is a print 24x33-actually the largest art print I have ever made and is for an upcoming museum show. It was scanned by me on a well maintained Imacon at SAIC and looked superb at that size. The grain (or grain clumping I don't suppose that an Imacon can actually resolve grain) was sharp and tight and looked great even on close inspection with my reading glasses, requiring no additional sharpening than the original Imacon capture sharpening (I don't remember the setting). This was never a "look" that I could get on large prints with my Epson. As a backup I had Lenny Eiger, Eiger Studios, do a drum scan of the same image in case it didn't hold up at that size. Lenny's scan pulled more deep shadow detail out of the negative, but I didn't need it-not a wasted expense anyway-I am archiving quality drum scans of all my best images from the past 30 years.
I know Lenny's drum scan has more deep shadow detail than the Imacon, but I tend to print this pretty deep anyway. There is a fair amount of work in the file and with a tight deadline looming, I was not wanting to start over with a new scan unless I had to. But in terms of resolution the Imacon could handle this size and on this image the tones were fine too.
Friday, September 3, 2010
The Dwell Effect
I have been discussing, off and on, the impact on our business of the popular magazine Dwell. It is not an abstract discussion as myself and many photographers I know have been asked to imitate that "Dwell Look". Well here is my latest, an art directed example for one of my favorite locally based national magazines.
The original a flat stitch of one of the reject poses with the camera in a horizontal position. The stitch was requested to insure that they had enough real estate to work from. There was great natural light that just needed to be slightly boosted and the ambient color to be cleaned up. Two lights were used, a fill bounced off the white wall behind me and one in the kitchen set slightly brighter to pull the eye in. When doing these kind of stitches, it is only necessary to shoot the left side once, but the right side with the home owner multiple times, in different poses, and then stitch the selected right side of the woman with the previously shot left side. This was a difficult stitch as there was not much detail in the overlap area for the program, PS CS4 to find reference points. I ended up manually stitching these. The right example has been cropped in some already at this point. The merge area is between the chairs.
Unfortunately I had to manually stitch a number of these before the art director decided which she wanted. Left-the final published cover. Right-one of the rejected poses.
The most recent cover in the same vein.
Thursday, August 26, 2010
Saturday, August 21, 2010
Monday, August 9, 2010
Ed Ranney's "New World Landscapes" at the Denver Art Museum
There's allot to see right now in Denver, Henry Moore's superb sculptures at the Denver Botanical Garden, King Tut at the Denver Art Museum........all magic.
But my favorite was the Ed Ranney, large format b&w photography, show at the Denver Art Museum. Traditional silver prints from 5x7 negatives, Ed's pristine images of archeological sites in Latin America was the highlight of my trip. Archeology sites are near and dear to my own aesthetic, partly because of the inspiration that Ed has given me for some 30 plus years.
Tuesday, August 3, 2010
Simply for the love of Architecture-Gehry in Las Vegas
Monday, August 2, 2010
Sinar creates adapter to mount DSLRs as digital backs
Sinar p-slr review
It maybe useful for some studio applications, but IMO for architecture it takes a very versatile tool (a full frame DSLR with T/S lenses) and turns it into an expensive boat anchor. Cambo and Arca have similar offerings. Sinar
To quote Christopher Barrett, a leading architectural photographer: "These are cool and all, I have one for my Arca, but they have a lot of limitations, namely the use of wide lenses. Maybe you could use wide Medium Format lenses, since they have a retrofocus design, but if you are going to use a view camera, why settle for lenses that are not quite as sharp as Rodenstock and Schneider's just so you can put a dslr on?"
It maybe useful for some studio applications, but IMO for architecture it takes a very versatile tool (a full frame DSLR with T/S lenses) and turns it into an expensive boat anchor. Cambo and Arca have similar offerings. Sinar
To quote Christopher Barrett, a leading architectural photographer: "These are cool and all, I have one for my Arca, but they have a lot of limitations, namely the use of wide lenses. Maybe you could use wide Medium Format lenses, since they have a retrofocus design, but if you are going to use a view camera, why settle for lenses that are not quite as sharp as Rodenstock and Schneider's just so you can put a dslr on?"
Saturday, July 10, 2010
Tuesday, July 6, 2010
Student show
Thursday, July 1, 2010
A visit from a master........
Richard Wasserman graciously came to my architectural photography class at SAIC yesterday to share his fine work. He showed original prints of two outstanding bodies of work, his Chicago River and Bensenville series. Richard is one of those guys I consider the "salt of the medium" doing fine work on their own because you are simply driven to by the subject matter.
Thanks so much Richard. It was a treat for the me and the students. Best of luck with the upcoming book of the Chicago River images and accompanying exhibit at the Harold Washington Library.
http://richardwasserman.net/
__________________Thanks so much Richard. It was a treat for the me and the students. Best of luck with the upcoming book of the Chicago River images and accompanying exhibit at the Harold Washington Library.
http://richardwasserman.net/
Thanks,
Kirk
Sunday, June 27, 2010
Shooting Tethered
There are many programs available for shooting tethered to a computer. Working up to an interior lighting demo for my students, I revisited Canon's EOS Utility/DPP and Lightroom 3 (the old Watch or "Hot Folder" method), a couple of software programs that support tethering. In the past I had not been impressed with earlier versions of either program for tethering. Both were flaky IME. For clients on a shoot that required a larger viewing experience, I used to resort to using a card reader or spend half my time fiddling with the computer link, embarrassing and stressful. LR3 now has a specific tethering feature that works with most recent major Canon and Nikon cameras (for supported cameras see. Nikon also has free software that comes with their cameras but I am not familiar with it.
Both programs seem much more stable now. Cannon EOS Utility/DPP supports full camera exposure control (plus ISO etc.) from the computer, while LR3 supports shutter firing and exposure info display only. Neither will work firing from the computer if you shoot with the Mirror Lockup on. I only shoot with the Mirror Lockup on, to minimize vibrations, so firing from the computer is not important to me. Why mirror locked up? Not to sound like a broken record, but to do truly professional quality work with a DSLR you have to make every possible effort available to maximize image quality. However both these programs seem less than happy when you shoot with MLU on, especially if you et the camera go to sleep and then try and wake it up by firing a shot. If this is an issue go back to regular firing.
In any event of the two I found LR3 to be the program that best fit my skills and workflow. I have never gotten comfortable with DPP. As I always shoot RAW and use Adobe Camera RAW in Photoshop to process the files, it is a short leap for me to the RAW processor in LR3, which though it has a slightly different interface than ACR is basically the same program. In the spirit of KISS (keep it simple stupid), a nod to my aging brain, the Canon 5d MKII>LR3>Photoshop workflow keeps things streamlined. Now of course LR3 is not free like the Canon DPP software suite is (DPP comes with the Canon camera and you can't download DPP from their website unless you have the original disks). Lightroom approaches $300, which may be a consideration for many.
Only the DPP suite supports tethered Live View. LR3 will not-again not very important to me.
One annoying thing. If you have the DPP suite loaded on your computer, even if you also have LR3 loaded and running, DPP seems always to be the default program to open up when you make an image while synced. if you work continually it only comes up the first time, but if you take a break and let the camera go to sleep and come back and try to fire the camera, the EOS Utility want to open up again. There seems to be no way around this unless you uninstall the EOSU/DPP suite. Anyone have any ideas on this? For teaching purposes I want to keep both on my laptop and for the odd time I want to shoot tethered in Live View. See the discussion below with Jim Hunter for a fix he found for this for both Mac and PC. See also Mac Fix.
Both programs seem much more stable now. Cannon EOS Utility/DPP supports full camera exposure control (plus ISO etc.) from the computer, while LR3 supports shutter firing and exposure info display only. Neither will work firing from the computer if you shoot with the Mirror Lockup on. I only shoot with the Mirror Lockup on, to minimize vibrations, so firing from the computer is not important to me. Why mirror locked up? Not to sound like a broken record, but to do truly professional quality work with a DSLR you have to make every possible effort available to maximize image quality. However both these programs seem less than happy when you shoot with MLU on, especially if you et the camera go to sleep and then try and wake it up by firing a shot. If this is an issue go back to regular firing.
In any event of the two I found LR3 to be the program that best fit my skills and workflow. I have never gotten comfortable with DPP. As I always shoot RAW and use Adobe Camera RAW in Photoshop to process the files, it is a short leap for me to the RAW processor in LR3, which though it has a slightly different interface than ACR is basically the same program. In the spirit of KISS (keep it simple stupid), a nod to my aging brain, the Canon 5d MKII>LR3>Photoshop workflow keeps things streamlined. Now of course LR3 is not free like the Canon DPP software suite is (DPP comes with the Canon camera and you can't download DPP from their website unless you have the original disks). Lightroom approaches $300, which may be a consideration for many.
Only the DPP suite supports tethered Live View. LR3 will not-again not very important to me.
One annoying thing. If you have the DPP suite loaded on your computer, even if you also have LR3 loaded and running, DPP seems always to be the default program to open up when you make an image while synced. if you work continually it only comes up the first time, but if you take a break and let the camera go to sleep and come back and try to fire the camera, the EOS Utility want to open up again. There seems to be no way around this unless you uninstall the EOSU/DPP suite. Anyone have any ideas on this? For teaching purposes I want to keep both on my laptop and for the odd time I want to shoot tethered in Live View. See the discussion below with Jim Hunter for a fix he found for this for both Mac and PC. See also Mac Fix.
Tuesday, June 22, 2010
Louis Sullivan through the eyes of Nickel, Szarkowski and Siskind
"Looking after Louis Sullivan: Photographs, Drawings and Fragments".
One of the best architectural photography exhibits I have ever seen is this newly opened Sullivan exhibit at the Art Institute of Chicago. Featuring images of Sullivan's designs by Aaron Siskind, John Szarkowski and Richard Nickel, this exhibit features many widely known and lesser known masterpieces of modern architectural photography. The exhibit also displays Sullivan's masterful drawings and many ornamental details salvaged from buildings. The museum did nothing in 2006 for the Sullivan 150 year anniversary, so this is 3 years late and low key-but superb. See it if you possibly can.
Looking After Louis Sullivan.....
Sullivan Exhibit
One of the best architectural photography exhibits I have ever seen is this newly opened Sullivan exhibit at the Art Institute of Chicago. Featuring images of Sullivan's designs by Aaron Siskind, John Szarkowski and Richard Nickel, this exhibit features many widely known and lesser known masterpieces of modern architectural photography. The exhibit also displays Sullivan's masterful drawings and many ornamental details salvaged from buildings. The museum did nothing in 2006 for the Sullivan 150 year anniversary, so this is 3 years late and low key-but superb. See it if you possibly can.
Looking After Louis Sullivan.....
Sullivan Exhibit
Vanishing Point Clone Tool in PS
This has been around since CS2, but I didn't discover it till CS4. Doh! I could have been using it for years. Going one step further from the cloning I taught in class the other day, lets look at "Vanishing Point Cloning". This, IMHO, is one of the most useful tools for architectural photographers in all of PhotoShop, because it allows one to perform corrections while maintaining perspective. From removing stains appropriately in carpets to fixing brick work, this tool has a myriad of uses. I went years before I discovered this procedure, and then it was one of these "Holy Crap" moments. Why didn't I discover this years ago! Imagine how many ways you can use this. The basic filter/tool is used this way:
Vanishing Point Clone Tool Video and More Vanishing Point Cloning
and a more involved and a bit over the top tutuorial for the Vanishing Point filter. There are some techniques to learn here that can be used in more believable and appropriate ways for traditional architectural photography. For instance I have used the wheels example similarly for replacing light fixtures that were not working. The exercise with the grass, I have used many times to fix bad areas in a lawn or pavement. Yes, IMHO, perspective in size of grass blades in a lawn or the granularity of pavement is important to pay attention to:
Vanishing Point: Photoshop Tutorial Video
Enjoy!
Vanishing Point Clone Tool Video and More Vanishing Point Cloning
and a more involved and a bit over the top tutuorial for the Vanishing Point filter. There are some techniques to learn here that can be used in more believable and appropriate ways for traditional architectural photography. For instance I have used the wheels example similarly for replacing light fixtures that were not working. The exercise with the grass, I have used many times to fix bad areas in a lawn or pavement. Yes, IMHO, perspective in size of grass blades in a lawn or the granularity of pavement is important to pay attention to:
Vanishing Point: Photoshop Tutorial Video
Enjoy!
Subscribe to:
Posts (Atom)